
Copic Coloring Tutorial - Basic
Copic Coloring Tutorial - Basic

Hello everyone, hope you all are doing great! I was asked by a few people if I could do a tutorial about how I color my images using Copic markers. This is going to be the first tutorial, a very general one. Over time I'll like to post Copic tutorials on how I color specific parts of an image like hair, cloth, skin, etc.
I would also like to mention that I am not "Copic certified" and this is just my way of coloring my images using Copic markers. I tried different techniques and papers and this is just what works best for me!
I would also like to mention that I am not "Copic certified" and this is just my way of coloring my images using Copic markers. I tried different techniques and papers and this is just what works best for me!
Ink: I always use Memento Ink for stamping my images when coloring with copics. This is a fade resistent, fast drying, dye ink with even ink coverage and save to use with your Copics. Summer has this ink in her store, click here.
Paper: If it comes to paper I don't accept any compromises anymore. *lol* ;-)I tried a lot off different papers. Cheap papers and expensive ones but the only paper I use for coloring with Copics is from Arjo Wiggins, Curious Iridescent - Cryogen White. This is in my opinion the very best paper to use, the colors are blending so easily and even little mistakes are much easier to remove. And it has an incredibly elegant shimmer to it. But as I said before, just MHO and everyone has different preferences.
Paper: If it comes to paper I don't accept any compromises anymore. *lol* ;-)I tried a lot off different papers. Cheap papers and expensive ones but the only paper I use for coloring with Copics is from Arjo Wiggins, Curious Iridescent - Cryogen White. This is in my opinion the very best paper to use, the colors are blending so easily and even little mistakes are much easier to remove. And it has an incredibly elegant shimmer to it. But as I said before, just MHO and everyone has different preferences.
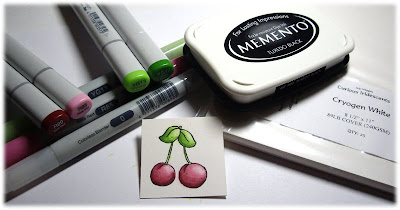
These are the products (as you can see on the above picture) used for my tutorial:
Memento Dye Ink - TUXEDO Black,
Magnolia cherry stamp,
Curious Iridescent - Cryogen White Paper,
Copics: 0 Blender Pen - YG11 - YG13 - YG17 - R83 - R85 - R89
Memento Dye Ink - TUXEDO Black,
Magnolia cherry stamp,
Curious Iridescent - Cryogen White Paper,
Copics: 0 Blender Pen - YG11 - YG13 - YG17 - R83 - R85 - R89

I start coloring the leaves and stems using the colors 0 (Blender Pen) - YG11 - YG13 - YG17
Always choose colors that are not too far apart and best from the same color family.

First you have to decide where your light is coming from. In my case the light is coming from the upper right corner. I start with my darkest color first (YG17) and color that part of the leaves and stems where the most shadows/darkest parts will be. I never use pressure when coloring with my copics.

Then I move on to the next lighter color, here YG 13.
Tip: Don't worry if you color a little over the lines you can easily remove this with your blender pen. Just take your broad side of the blender pen and kind of push the color back towards the image. Do this without using too much pressure. Some colors are removed easily and for some colors you will have to repeat this procedure (e.g.the reds are kind of persistent).
If you can't get it fixed right away, wait in between your attempts and let it dry a little so you wont do damage to your paper.

With little circular movements start blending the colors together using your YG13 pen. (see above)

Now you are ready for your lightest color YG11. Do not touch the area you want to be the lightest part of the leaves with any color yet! Same here: blend the third color in nicely. With your lightest color you can also go over all the already colored areas on the leaves to get it even more blended. But not too much over your darkest areas as it will lift the color.

After all colors are blended nicely take your lightest color YG11 and your blender pen. With your blender pen touch the tip of the YG11 pen (see picture) And now with light feathery strokes apply the color (from your blender pen) starting at the edge of the colored area moving towards the white area. On and off touching the YG11 pen with your blender tip to get more color (if needed). You only want just a very little color on the lightest part and very soft and smooth edges. Be careful not to touch your already colored area too often with the blender pen as it removes the color kind of quickly sometimes! In the same way do the rest of the stems!

Now on to the cherries. For coloring the cherries I use R83, R85, R89 and the blender pen (my favorite tool ;-) )

As with the leaves I start laying down my darkest color, R89, first. Not too much just in the areas I wanted the cherries to be darkest. Always remember where your light source is coming from.

Now apply your next lighter color, in my case R85.

Blend it in nicely again.

Now it's time for the lightest color (R83), lay it down and blend, as before!
Remember leaving the part you want to be lightest on your cherries untouched!

In the same way we applied the color with the blender pen and lightest Copic color on the leaves (using light feathery strokes) do it now with the cherries. In this case R83 was used.

And voila! We've finished coloring our cherries! :-)
I hope you liked my tutorial. As I said before this is just my way of coloring with the Copics and the techniques that work best for me. And if you are new to copics don't give up too fast. Coloring with copics means practice, practice practice! Once you got the hang of it you will LOVE them!
So get out your Copics and start coloring! :-)
Hugs,

Thanks for stopping by!
Hugs,

I am enjoying your blog SOOOO much!
ReplyDeleteI am fairly new to scrapbooking and card making so I am still soaking everything in.
I have not really used stamps before butI plan on ordering a bunch this week...thanks to you
I LOVE Tickled Pink!
I am ordering copics this week also and will be trying something new..Thanks for the inspiration.
I will be following you!
April
Thank you so much for your fabulous tutorial. Really pleased I've found your blog.
ReplyDeleteBig hugs.