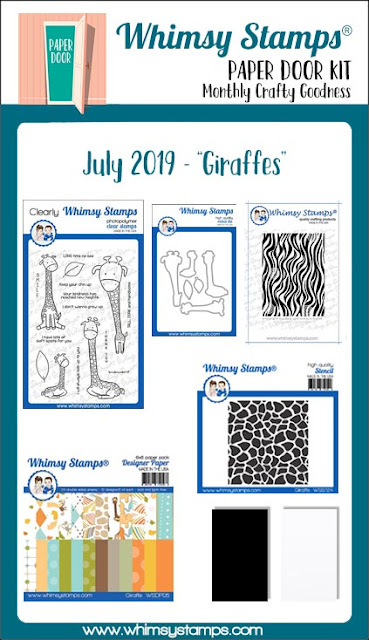
July 10, 2019

New Paper Door Kit For July Is HERE!!! - Giraffe's

Hi All! It's the time of the month again! The new July PaperDoor Kit is here - Giraffe's! Oh my goodness this is cuteness overload! I mean GIRAFFE'S, right?! LOL I think it can't get more adorable than that. But here see for yourself:


         BRAND NEW kit debuting on the 10th of each month
    Each kit is a $50+ retail value for only $29.95 plus shipping
    EXCLUSIVE 6x6 Whimsy Stamps designer paper pack collections, fun and creative design
      on heavy weight paper with a beautiful sheen - 24 double sided sheets
    TEN sheets of 8.5x5.5 heavy weight neutral card stock - in black and white
    SPECIAL EDITION 4x6 clear stamp set "Giraffe" created exclusively for PAPERDOOR
    COMPLEMENTING "Giraffe" outline die set to easily cut out the images from the 
      4 x 6 stamp set, designed exclusively for PAPER DOOR
    SPECIAL EDITION "Zebra Stripes" mini background rubber stamp and "Giraffe" stencil
      introduced especially for PAPER DOOR

PRIVATE access to PDF files with step-by-step instructions for at least 4 different projects

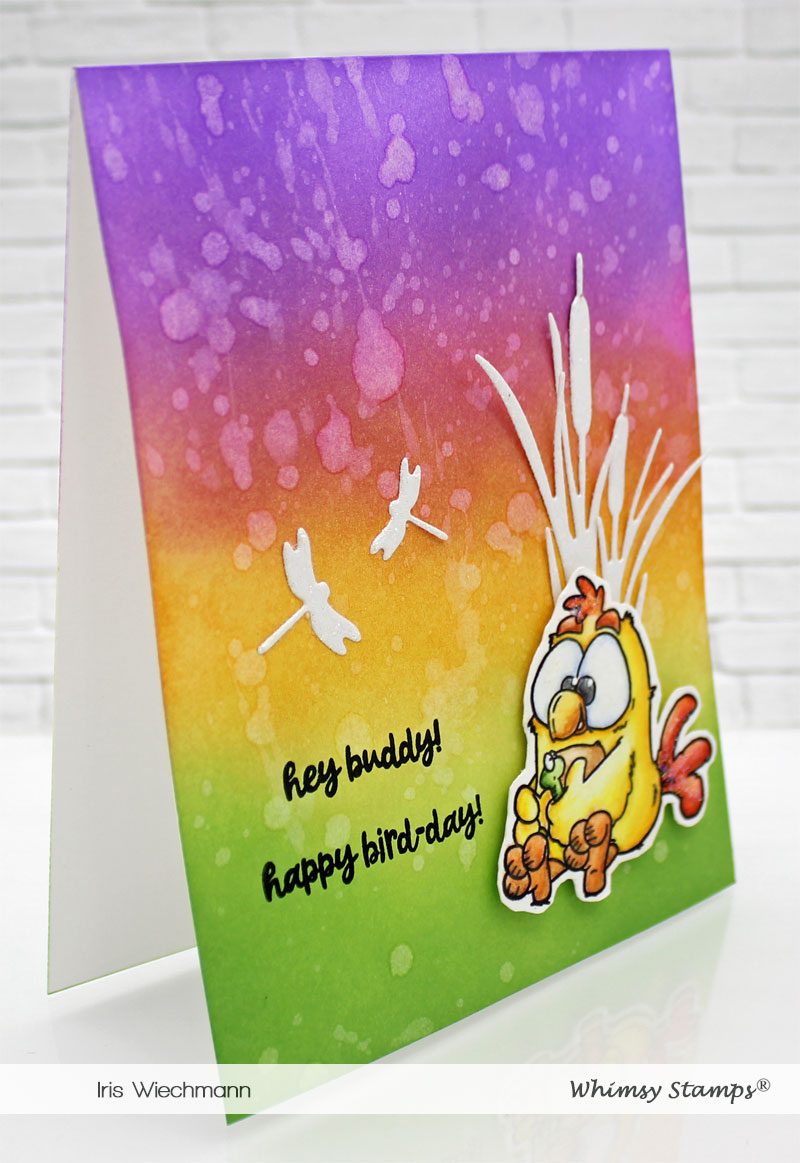
Here is my first project made with this amazing kit:


How cute is that??? I was totally in awe while coloring these cuties. For this one I opted for a combination or blue and orange-brown. I think it turned out quite well. What do you think? The background was created using the included Giraffe stencil with Distress inks.

Here is a closer look on the giraffe:


We’ve made PAPER DOOR an easy and affordable way for you to enjoy a monthly card making kit:
NO minimums
NO subscriptions to commit to
NO wait lists to sweat out
NO multi-tier pricing

Each kit is a LIMITED EDITION and individual items may or may not be released at a later date. Supplies are limited so order yours today, and unlock your creativity with Whimsy Stamps PAPER DOOR kits!

The paper strips I used for my sentiment are from the included beautiful Designer paper pad Giraffe. I am sure this kit sells out in no-time! So if you want a kit make sure to just pop over in the Whimsy store now and get yours before they are all gone. I have a feeling these will fly off the shelves in lightning speed! They usually all do but this one will be gone before you can say Giraffe....LOL


Here is a list for all the Whimsy products I have used:


     Nuve - Deluxe Adhesive     Crafty Foam Tape White

VersaFine CLAIR Ink Pad - Nocturne (black)         Memento Full-Size Ink Pad - Tuxedo Black    

Copic Sketch Markers Cadmium Red [Pack Of 3] (3PK-R27S)


Thanks for visiting today! 

Hugs,


July 3, 2019

More July Release Inspiration - Happy Bird-Day

Hello Crafty Friends! Here is another card I made with a new release image from Whimsy Stamps. This time it's an image from Dustin Pike called Early Birds.

I love how the background turned out, so bright and vibrant. To create it I used distress inks (wilted violet, picked raspberry, spiced marmalade and twisted citron mixed with a bit of mowed lawn) and a blending brush. To add some texture I sprinkled on some water. The little Early Bird was colored  again with water color pencils (Albrecht Durer-Faber Castell).


The cattails and dragonflies are die cut from white glitter paper using the NEW Build-a-Pond die set. The sentiment is included with the clear set.


 Here is a list with all the Whimsy products I've used:

*NEW Early Birds Clear Stamps   *NEW Build-a-Pond Die Set   Nuve - Deluxe Adhesive    

Stickles Glitter Glue - Star Dust    Crafty Foam Tape White   VersaFine CLAIR Ink Pad - Nocturne (black)   

Distress Ink Mini Pad - Wilted Violet   Distress Ink Mini Pad - Picked Raspberry   Distress Ink Mini Pad - Spiced Marmalade    


Thanks for stopping by today!

Hugs,


July 1, 2019

Whimsy Stamps July 2019 Release - Magical Horse Scene


Happy Monday & Welcome to the Whimsy Stamps July 2019 Release! There will be lots of new rubber and clear stamps released today along with some beautiful dies and stencil. Make sure you hop on over to the store and browse through the newly added goodies HERE.

Also please visit the Whimsy Inspirations Blog to see more wonderful creations from my fellow CT sisters! 

Here is my first project for this release. I used Horse Scene from the DoveArt line to create this card.

I stamped the image using Memento Tuxedo Black ink onto white Hammermill cover copy 100lb cardstock and colored with Copics. To create the white water froth around the horses feet I used white shimmery acrylic paint. Don't feel intimidated by these kind of stamps. It's actually pretty simple to color them up. I love coloring them as they have most of the shadow areas already drawn in by the artist. Just use it as a guide and coloring will be quick and also very relaxing as it takes out some of the guess work. If you havent tried coloring one of these more intricate stamps from the DoveArt line give it a try. You will love it!

Here is a closer look on the image:

I also added some flowers to the meadow using a white gel pen and violet and purple glitter gel pens.


The star border was created using the Upon a Star die set. The sentiment is from the 'Mermaid Dreams' clear set and was stamped with Versafine Clair Nocturne ink onto shimmery teal cardstock.
I cut out the sentiment using the second smallest circle from the Pierced and Stitched Circles die set.

Here is the product link list:

*NEW Horse Scene Rubber Cling Stamp   Pierced and Stitched Circles Die Set   *NEW Mermaid Dreams Clear Stamps   Upon a Star Die Set   Nuve - Deluxe Adhesive     Crafty Foam Tape White

VersaFine CLAIR Ink Pad - Nocturne (black)    Copic Sketch Markers Cadmium Red [Pack Of 3] (3PK-R27S)   


Thanks for stopping by. See you next time.

Hugs,

June 29, 2019

Art Journal Page - Happy Place


Hello and Happy Saturday! I've showed you several art journal pages over the last few weeks and here is my last one for now. I call it Happy Place. I used newer and older Whimsy Stamps products to create it. 

I started out with some glossy cardstock and distress oxide inks. I smushed the ink pad (peacock feather) pad onto my craft mat 2-3 times. Spritzed it with water to activate the oxide ink and took my glossy cardstock and swirled it around in the ink. Important: To have all the different layers of color show beautifully through in the end, you have to let the ink dry after each color application and wipe away the dull, hazy oxide film that has formed on top of the ink with a dry cloth/paper towel . Now you can apply the next layer of color in the same way. Do this with all the colors until you are satisfied with your result. Seal the page with distress micro glaze to make it water resistant.


When I was done creating my background I added several layers of stencils and stamped images. I also added some some foil using Transfer Gel, the Swish stencil and rose gold foil. To create the flowers I applied oxide inks, in the same colors I used for my background, onto white cardstock. Die cut the flowers (Peony Flower Die), spritzed them with water and crinkled them carefully while still damp.


Whimsy products used:

Happy Place Clear Stamps   Polka Dot Stencil   Speckled Heart Stencil  

Swish Stencil   Peony Flower Die   Quick Strips Die Set    

VersaFine CLAIR Ink Pad - Nocturne (black)   Stickles Glitter Glue - Star Dust   Deco Foil Transfer Gel   

Deco Foil Transfer Sheets - Rose Gold   Distress Oxide Ink Pad - Faded Jeans   Distress Oxide Ink Pad - Peacock Feathers


Thanks for visiting me here today!
Hugs,